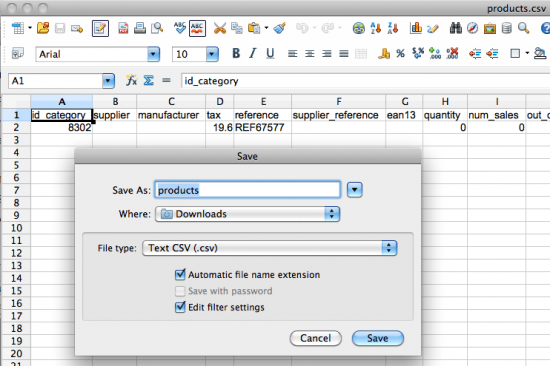
To get started, you'll need to set up a template file, and ensure that the column headers (titles) are correctly formatted. When you're importing your products, the site manager will identify the various different product details by using the column title. To use the correct column titles, you can simply copy the names for each column directly from the Export tab of the site manager (under the Store > Import-export menu). However, you'll probably find it a lot easier to generate them automatically – by doing so, you'll avoid errors, and ensure your products will be imported first go.
Generating the template file from the manager is easy. Just select the fields that you need for your products under the Export tab (you'll need to select at least two fields: “name” and “price”, the others are optional for a first-time import). Once you've selected the fields to export, just click the Export button. The manager will create a CSV (comma separated variables) file entitled “products.csv” for download, which can then be opened using Excel, OpenOffice, Numbers or any other standard spreadsheet program. To ensure the downloaded template file is formatted correctly when you open it, you'll need to provide a couple of details in the file import dialog box. Just select “Tabs” as the field separator, and ensure the text is encoded in "ISO – Western Europe".
Once the file is opened, you'll see a list of columns with the values for each product listed on a separate line below. If you're exporting existing products from your online store, you can simply locate them by their product name or reference, then adjust whatever details you need to by editing the appropriate cells in the table. To add a new product, just add a new line below the last product in the table, and provide the relevant information - remember, you'll need to give each product a name and a price. If you're importing a large number of products at once, it can be useful to add them directly to their category in the store catalog – it'll save you a lot of time later on. Start by setting up the store categories first from the Store > Catalog menu of the site manager, then add a dummy product to each category. By giving each dummy product a unique and easily-identifiable name, you'll be able to quickly locate it's corresponding category ID in the file you'll export, which you can then use to copy and paste next to new products to file them under the appropriate categories.
Once you're finished adding your products to the template, you're ready to save your file and import it (and your products) directly into your store. Just as you did during the export process, you'll need to ensure you format the file correctly when you save it. There are a couple of settings you'll need to check, so use the “Save as” or “Export” feature of your spreadsheet program to access the formatting options. If you're using OpenOffice, you'll need to choose the “Save as” option, ensure you select the “CSV” file format then check the “Edit filter settings” box to access the advanced file formatting options.

Choose “ISO – Western Europe”, as the character setting or encoding option, “Tabs” as the field separator and lastly remove any pre-set text delimiter (if a default text delimiter or separator is selected, just erase it to leave the option blank). That's it – you can now save your file for import.
All you need now do is import the file via the Import tab of the Store > Import-Export menu. Any existing products – identified during the import process by their unique “reference” - will be automatically updated, and new products added to the appropriate category. If you haven't set a category for any of your products, a new category entitled “Imports” will be created. To move your products into a different category, just edit them to select a different product category, and save your changes. Using the new Import and Export features of doomby's e-commerce module makes it easy to make an a-commerce website with a fully-stocked online shop in no time. Give it a try – we know it'll make setting up and editing your store catalog a whole lot quicker and easier. And don't forget – if you have any suggestions for ways to make these features work better for your store – just let us know by posting a comment, forum message or contact the support team!

