Coding

Add universal video support with HTML5

Using HTML5 video is a good idea if you’re serious about making your site video content accessible to a maximum number of devices and browsers. And by adding a few lines of code, your site videos will be accessible to HTML5-ready browsers and devices (including iPhones and iPads), while providing a fallback solution for older browsers.


Choosing the right HTML5-compatible video formats

The HTML5 video standards and browser implementations are still a work in progress, so if you want to ensure your videos are compatible with everything, you'll need to export your videos into at least two of the following three "container" formats:

  • .mp4 (or "H264", for IE 9+, Safari 3+, Android 2+ and iOS 3+ (iPhones and iPads))
  • .ogv (or "Theora", for Firefox, Chrome, Opera 10.5+)
  • .webm (or "VP8", for Firefox 4+, Chrome 6+; Opera 10.6+, Android 2.3+)

Though you only need to choose one of the last two container formats, adding both ensures maximum compatibility in case a browser drops support for one of the two formats.

We'll add the .mp4 container inside a Flash-based player to provide a fallback for older, HTML4 browsers, like IE 6-8. You can download one from here or choose a different player if you'd prefer.

Converting video formats

You'll need to convert your site video to at least 2 formats, by using a compatible video converter.

Miro is a free, open-source tool compatible with Macs and PCs. It's simple to use: just install, then select the video source and one of the pre-configured output formats.

Storing the video files

In order to add videos to your page, they'll need to be published online. If their file size is small enough (under 8MB) you can add them to your emyspot file storage space. For larger videos, you'll need to store them externally via a third-party tool like Dropbox.

Don't forget, you'll also need to upload the Flash player file.

If you downloaded the Flowplayer (in step 1), decompress the downloaded file and store the player file (flowplayer-3.2.6.swf) online in your site storage space or externally.

Add the HTML video code to the page

Once the files are published (accessible) online, you’re ready to integrate them into a page of your site. Begin by adding the following code to one of your site pages via the HTML editor:

<video>
<source src="MP4-VIDEO-URL" type='video/mp4; codecs="avc1.42E01E, mp4a.40.2"'>
<source src="WEBM-VIDEO-URL" type='video/webm; codecs="vp8, vorbis"'>
<source src="OGV-VIDEO-URL" type='video/ogg; codecs="theora, vorbis"'>

<object width="320" height="240" type="application/x-shockwave-flash"
data="FLASHPLAYER-URL">
<param name="movie" value="FLASHPLAYER-URL" />
<param name="allowfullscreen" value="true" />
<param name="flashvars" value='config={"clip": {"url": "MP4-VIDEO-URL", "autoPlay":false, "autoBuffering":true}}' />
</object>
</video>

Note that if you’ve decided to only add 2 formats, remove the unused “source” line of code for the .webm or .ogv file.

Editing the HTML code

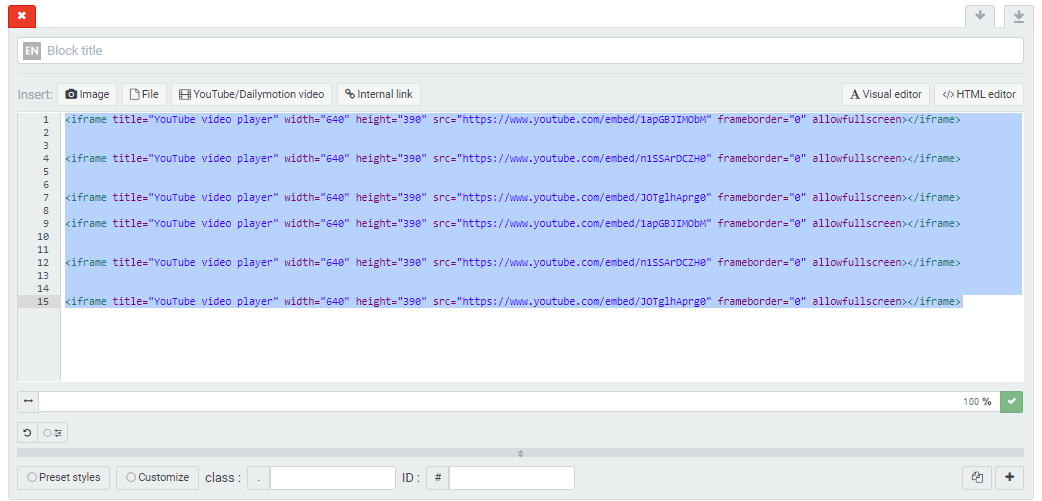
You’re almost done – all that’s left is to edit the code to replace the URL markers with the URLs of your videos and the Flash player.

Begin by coping each URL from your file storage space or the Dropbox public link, and paste it in the code to replace the URL markers in the code.

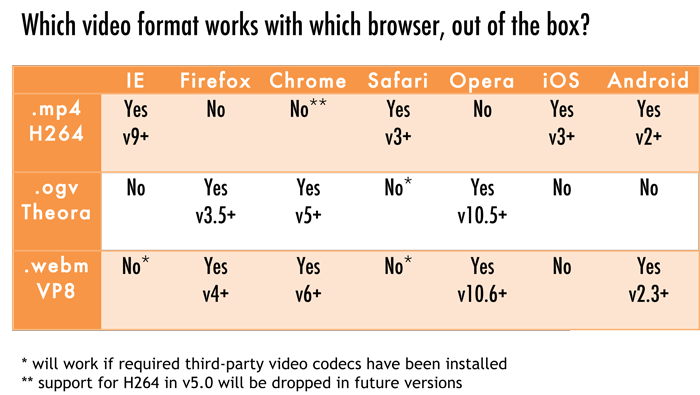
In the following example and accompanying illustration, we’ve used all three video formats, so we’ve replaced 6 references in the code. Each of the three video URLs has been added to the 3 “source” code lines (1-3), the Flash player URL twice to the “object” code (4-5), in addition to the mp4 URL used by the Flash player (6):

<video width="640" height="360" controls autoplay>
<source src="http://dl.dropbox.com/u/17944878/HTML5video/emyspot-free-website-builder.mp4" type='video/mp4; codecs="avc1.42E01E, mp4a.40.2"'>
<source http://dl.dropbox.com/u/17944878/HTML5video/emyspot-free-website-builder.webm" type='video/webm; codecs="vp8, vorbis"'>
<source src="http://dl.dropbox.com/u/17944878/HTML5video/emyspot-free-website-builder.theora.ogv" type='video/ogg; codecs="theora, vorbis"'>

<object width="320" height="240" type="application/x-shockwave-flash"
data="http://dl.dropbox.com/u/17944878/HTML5video/flowplayer-3.2.6.swf">
<param name="movie" value="http://dl.dropbox.com/u/17944878/HTML5video/flowplayer-3.2.6.swf" />
<param name="allowfullscreen" value="true" />
<param name="flashvars" value='config={"clip": {"url": " http://dl.dropbox.com/u/17944878/HTML5video/emyspot-free-website-builder.mp4 ", "autoPlay":false, "autoBuffering":true}}' />
</object>
</video>


We’ve also added window dimensions, player controls and autoplay functions to the video tags (7). Save your changes, and you’re done!

HTML5 video in action

To see an example of the above code, head to this page, and test with different browsers, as each one will load its own video player, or use the Flash player as a fallback (non-HTML5 browsers).

To find out more about HTML5 and videos, see this excellent HTML5 video article, on which this tutorial is based.